Water damage checklist first 24 hours — this is the most critical window for protecting your property after any water emergency. The actions you take (or don’t take) in the first 24 hours determine whether damage stays manageable or spirals into a major restoration project with mold, structural problems, and costs that multiply every hour.
Print this water damage checklist first 24 hours guide and keep it somewhere accessible. When water damage strikes, you’ll be glad you have a clear plan ready.
Immediate Actions — First 30 Minutes
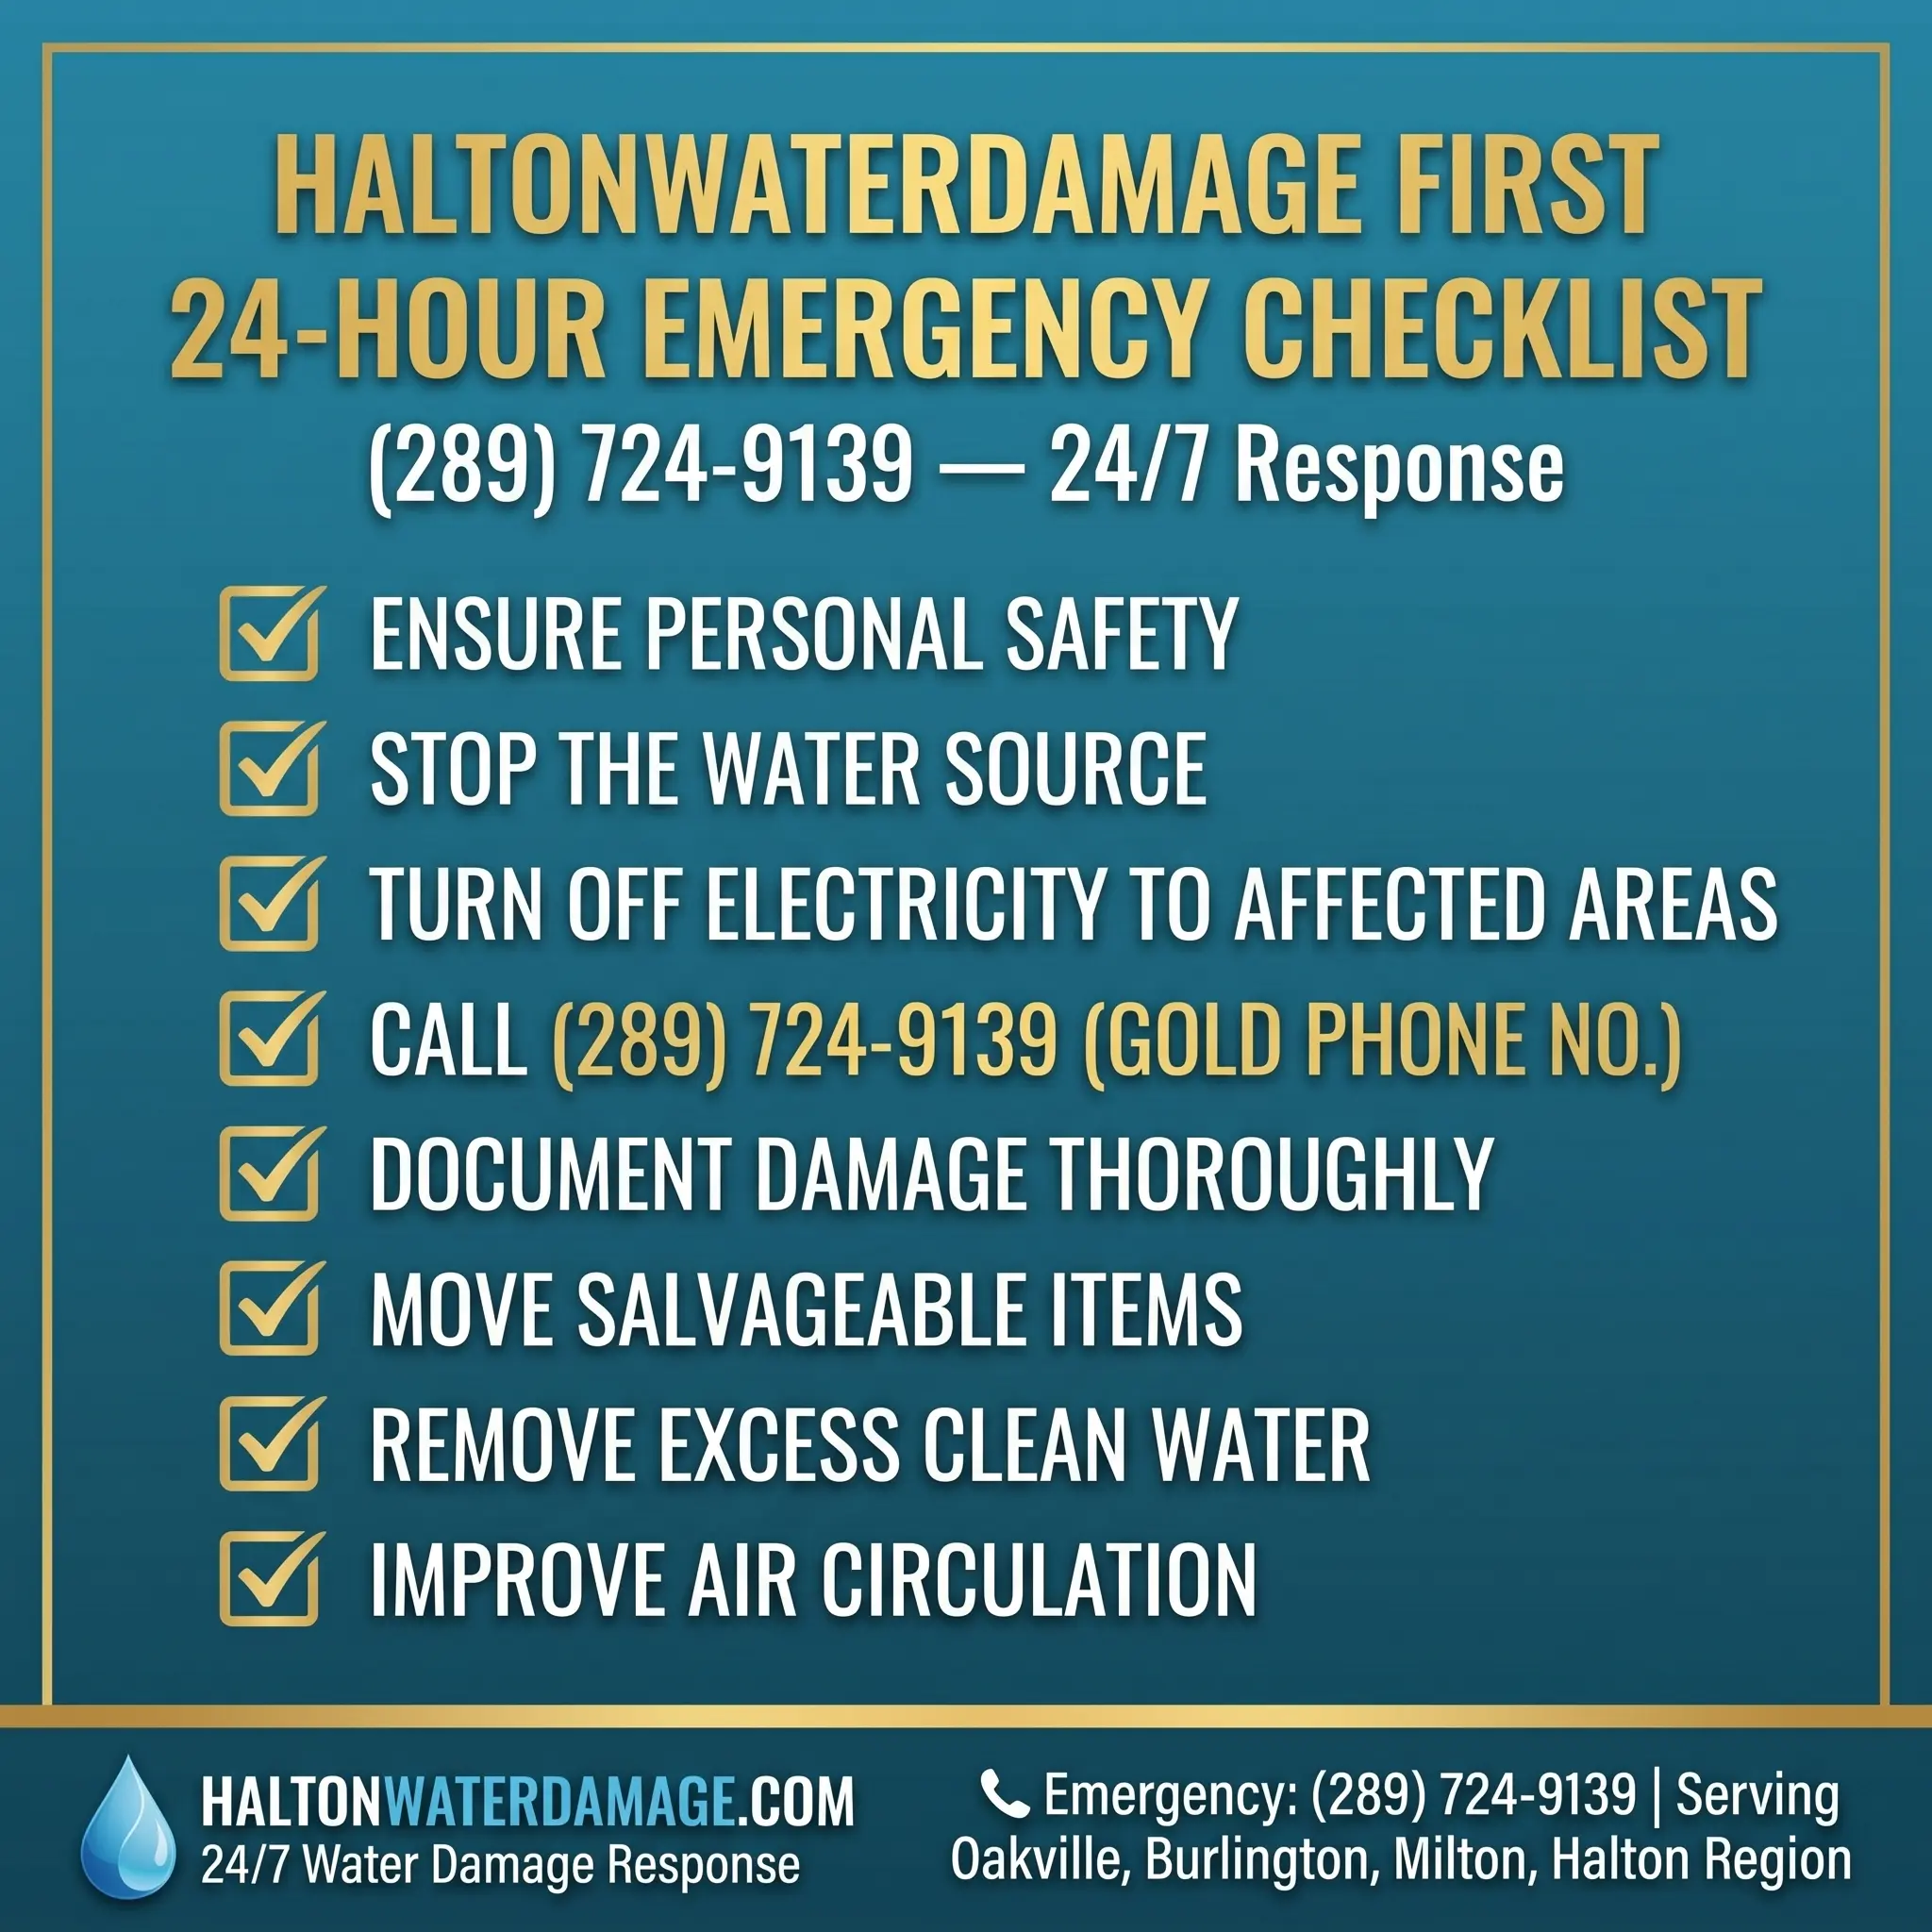
1. Ensure Personal Safety
Your safety comes first. Do not enter any area where water is near electrical outlets, your electrical panel, baseboard heaters, or furnace. Water and electricity can kill. If your basement is flooded and you can’t reach the breaker box safely, call your hydro provider to disconnect power remotely.
If you smell natural gas, leave your home immediately and call Enbridge Gas emergency services from outside.
If the water is from a sewer backup, do not enter without protective equipment. Sewage contains dangerous bacteria and pathogens.
The Government of Canada recommends never entering floodwater near electrical systems.
2. Stop the Water Source
If the source is a burst pipe, shut off your main water valve immediately. Every homeowner should know the location of this valve before an emergency. Its typically in the basement near the water meter.
If the source is an appliance (water heater, washing machine, dishwasher), shut off the water supply valve behind or beneath the appliance.
If the flooding is from heavy rain or sewer backup, you can’t stop the source — focus on the other steps.
3. Turn Off Electricity to Affected Areas
If you can safely reach your electrical panel without stepping in water, turn off breakers for the affected areas. If you can’t reach it safely, call your hydro provider.
4. Call for Professional Help
Call (289) 724-9139 for 24/7 emergency water damage restoration. Professional extraction and drying, starting within the first hours, dramatically reduces total damage and cost. Don’t wait to see if things dry on their own — they won’t.
First 1 to 4 Hours — Documentation and Damage Control
5. Document Everything
Before moving or cleaning anything, document the damage thoroughly for your insurance claim.
Take photos and videos of water levels from multiple angles. Photograph all damaged rooms, walls, floors, and ceilings. Take close-up photos of damaged belongings and appliances. Record video showing the overall scope of damage. Note the time you discovered the damage and the apparent source.
This documentation is critical for your insurance claim. Without it, you may have difficulty getting full coverage.
6. Contact Your Insurance Company
Call your insurer as soon as possible to report the damage. Have your policy number ready. Describe the cause of the water damage, when you discovered it, and the extent of damage. Ask whether your specific situation is covered (sudden pipe burst vs. overland flooding vs. sewer backup has different coverage).
Your insurer will assign an adjuster and guide you through the claims process.
7. Protect Salvageable Items
If you can safely enter the affected area (power is off, water is clean), move valuable and irreplaceable items to a dry location. Prioritize photo albums and family documents, electronics (laptops, hard drives), important paperwork (tax records, legal documents), and high-value items.
Do not throw anything away until your insurance adjuster has documented the damage — or at a minimum, photograph everything before disposal.
8. Remove Excess Water If Safe
If the flooding is minor and from a clean source, you can begin removing surface water with a wet/dry shop vac, mops, and towels. Never use a regular household vacuum on water.
For anything more than minor clean water, wait for professional equipment. Basement flood cleanup requires industrial extraction that household tools can’t match.
4 to 12 Hours — Active Mitigation
9. Improve Air Circulation
Open windows if the weather permits to increase airflow. Turn on ceiling fans in unaffected areas. If your HVAC system wasn’t impacted by water, running it can help reduce humidity. Do not use your HVAC system if water may have entered the ductwork — this can spread contamination through your entire home.
10. Remove Wet Items from Floors
Lift furniture off wet carpet or flooring by placing aluminum foil or plastic under the legs. This prevents staining and further damage to both furniture and flooring. Remove area rugs and lay them flat to dry in a well-ventilated area.
11. Open Cabinets and Closets
Open all cabinet doors, closet doors, and interior doors in the affected area. This allows air to circulate into enclosed spaces where moisture gets trapped, and mold grows fastest.
12. Begin Removing Soaked Materials
If professional help hasn’t arrived yet and the water source is stopped, begin pulling wet carpet away from the floor (but don’t remove it completely — your restoration team will assess what’s salvageable). Remove soaked cardboard boxes, papers, and other items that are actively dripping and spreading water.
12 to 24 Hours — The Mold Prevention Window
13. Professional Extraction Should Be Underway
By this point, professional water extraction and drying should be actively in progress. Industrial pumps, commercial dehumidifiers, and air movers should be running throughout the affected area. If you haven’t called for professional help yet, do it now — the 24 to 48 hour mold growth window is closing.
14. Monitor for Secondary Damage
Check adjacent rooms and the floor below (or above) the affected area for signs of spreading water. Water travels through wall cavities and along pipes, so damage can appear in unexpected locations.
15. Keep Records of All Actions
Continue documenting everything — photos of cleanup progress, receipts for any supplies purchased, names and contact information of all professionals involved. Your insurer needs a complete record.
16. Arrange Temporary Accommodations If Needed
If the damage is severe enough that your home isn’t safe or comfortable, arrange temporary housing. Many insurance policies include coverage for additional living expenses. Check with your insurer about this benefit.
What NOT to Do in the First 24 Hours
Don’t ignore it — Even small amounts of water cause significant hidden damage.
Don’t use regular vacuums — Standard vacuums on water create electrocution risk.
Don’t turn on ceiling fans in rooms with sagging ceilings — A water-logged ceiling could collapse.
Don’t enter sewer-contaminated water — Category 3 black water is a serious health hazard.
Don’t start repairs before drying is complete — Replacing drywall over wet framing traps moisture and guarantees mold.
Don’t wait for things to dry naturally — Without professional dehumidification, trapped moisture leads to mold within 48 hours.
After the First 24 Hours
The first 24 hours are about emergency response and damage control. After that, the focus shifts to complete structural drying (3 to 5 days), sanitization, and eventual restoration. Your water damage restoration team manages this process and keeps you informed throughout.
If mold has already started (water sitting 48+ hours before professional help), mold remediation becomes part of the restoration scope.
Be Prepared — Save This Water Damage Checklist
Bookmark or print this water damage checklist first 24 hours guide. When an emergency hits, having a clear action plan saves you time, money, and stress. Know where your water shutoff valve is. Know your insurance policy number. Have our emergency number saved in your phone.
📞 Emergency: (289) 724-9139 — 24/7 Water Damage Response
Serving Oakville, Burlington, Milton, Halton Hills, and the entire Halton Region.
0 responses to “Water Damage Checklist First 24 Hours — Emergency Action Guide”